Transferring a domain name from GoDaddy to another registrar involves a series of steps that must be meticulously followed to ensure a smooth transition. This guide is designed to provide you with a detailed, comprehensive walkthrough of the process, ensuring that your domain transfer is successful and hassle-free.
- Understanding the Domain Transfer Process: Pre-Transfer Checklist
- No Downtime: Transferring Your Domain Name from GoDaddy
- Making the Smart Switch: Transferring Your Domain Away from GoDaddy
- Preparing Your Domain for Transfer
- 1. Unlock Your Domain At GoDaddy
- 2. Turn Off GoDaddy Whois Privacy Protection
- 3. Retrieve the Authorization Code or EPP Code from GoDaddy
- 4. Authorize GoDaddy Domain Transfer
Understanding the Domain Transfer Process: Pre-Transfer Checklist
Before initiating a domain transfer, it’s important to understand that a domain name from GoDaddy can’t be transferred within 60 days of registration or a previous transfer, or if a change has been made to the registrant’s contact information within that time frame. Additionally, make sure the domain is not on ‘hold’ due to non-payment or legal disputes.
GoDaddy has a rule where they put a 60-day lock on your domain if a change has been made to the registrant’s contact information. This lock stops you from transferring your domain to another service provider.
If you’re looking to read more about updating your contact info at GoDaddy, check out their help article.
To get around this lock, you can wait to update your contact info until after you’ve moved your domain to a new provider, like Aveshost
If you really need to change your contact details at GoDaddy and don’t want to be locked for 60 days, you should be able to opt out of the 60-day lock via email. Remember, you can only do this if you’ve turned off the Domain Privacy setting.
If your domain is already locked by GoDaddy, you can ask them to remove it. Send an email to GoDaddy’s Review 60 department at review60@godaddy.com, and they’ll look into it for you.
No Downtime: Transferring Your Domain Name from GoDaddy
During the domain transfer process from GoDaddy, your domain will seamlessly remain active without experiencing any downtime. It’s worth noting that the nameservers associated with the domain will stay consistent, ensuring a smooth transition without disruptions to your online presence.
Making the Smart Switch: Transferring Your Domain Away from GoDaddy
If you’ve experienced the challenges of GoDaddy’s renewal prices. You understand the frustration of seeing your domain renewal costs increase unexpectedly. What initially began as an introductory offer can evolve into an expense that puts a strain on your budget. This is a common scenario in the web hosting realm, but it doesn’t have to be your experience.
In this blog post, we guide you through every step necessary to transition your domain name from GoDaddy. It’s essential to note that this is a comprehensive guide applicable to all domain registrars, including Namecheap, NameSilo, and others.
Should you decide to transfer your domain name from GoDaddy to Aveshost. We can assure you it’s a smooth and hassle-free process, setting you up for success.
Aveshost stands out in the web hosting marketplace, understanding the importance of straightforward pricing. When you choose Aveshost for your domain services. You’re not just getting a competitive price but a commitment:
no hidden charges, no last-minute fees—just transparent, affordable pricing that respects your budget and business.
Now, let’s dive in.
Preparing Your Domain for Transfer
Before you transfer your domain from GoDaddy, there’s a bit of housekeeping to take care of. Ensuring your domain is ready for transfer is crucial, so pay attention to these points:
- Unlock Your Domain: Log in to your GoDaddy account and ensure your domain is not locked. A locked domain is a no-go for transfer.
- Update Contact Information: Verify that your administrative contact information is up-to-date.
- Disable Privacy Protection: If you have privacy protection enabled, disable it temporarily for the transfer process.
- Obtain the EPP Code: This is the authorization code and it’s as important as a passport for your domain’s transfer.
- Check Domain Age: Make sure your domain is at least 60 days old, which is a mandatory waiting period imposed by ICANN.
1. Unlock Your Domain At GoDaddy
- Access your GoDaddy account.
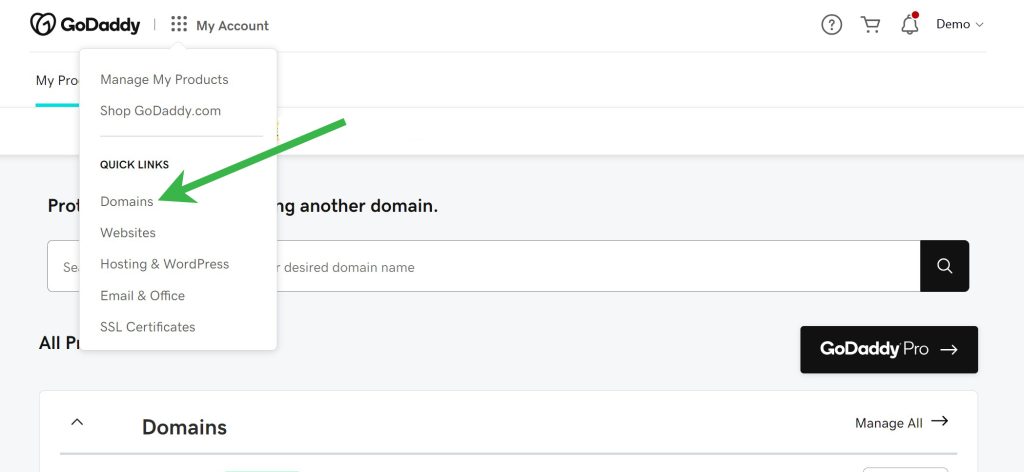
- Click on My Account and choose Domains from the dropdown menu:
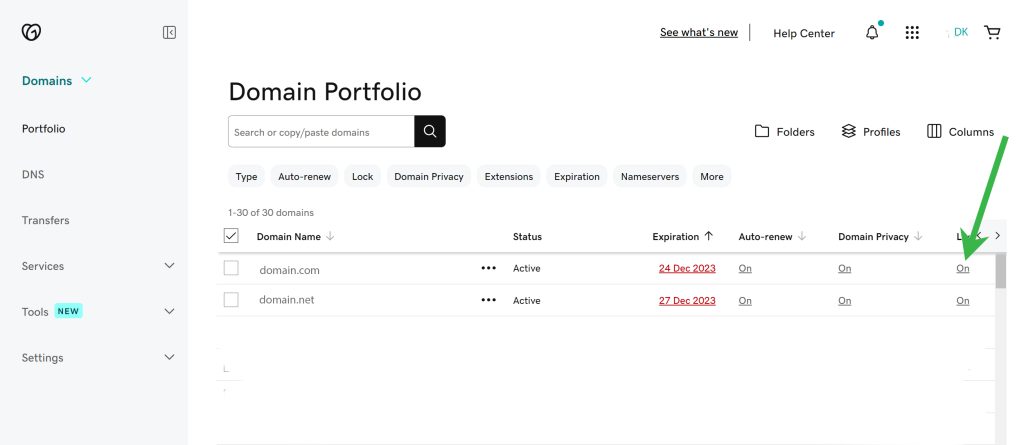
- On the domain portfolio page, look for the domain you want to transfer and turn off the lock. Turning the lock from ‘On‘ to ‘Off‘ unlocks the domain.
2. Turn Off GoDaddy Whois Privacy Protection
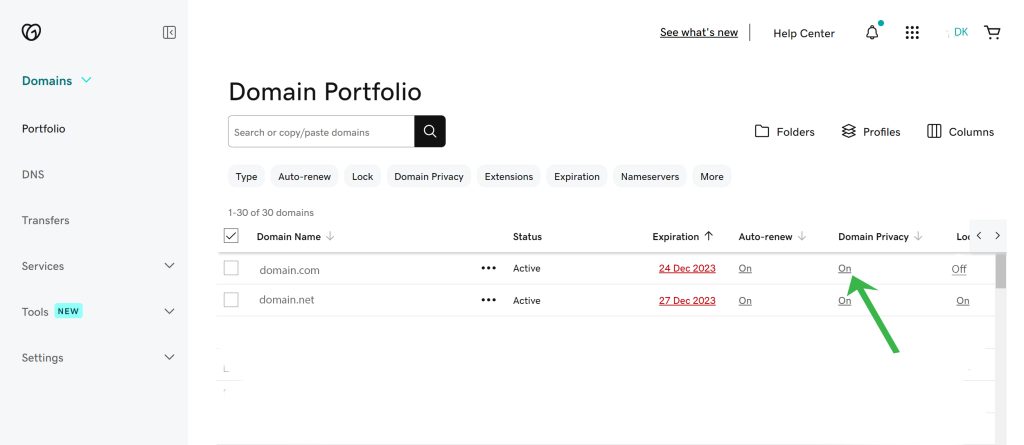
When GoDaddy’s privacy protection is activated, domain transfers are prohibited by their policy. Transfer requests will be rejected while Privacy Protection is active. Disable it before proceeding with the transfer.
Turn off domain privacy. Please take If you’ve subscribed to a paid Domain Protection plan at GoDaddy (Full Domain Privacy & Protection or Ultimate Domain Protection & Security). There is an additional layer of the verification process you have to complete. GoDaddy will send a verification email to your account, asking you to cancel the Paid Domain Protection before proceeding to turn off the WHOIS privacy protection.
3. Retrieve the Authorization Code or EPP Code from GoDaddy
- Login to your GoDaddy account.
- Click on My Account and choose Domains from the drop-down menu.
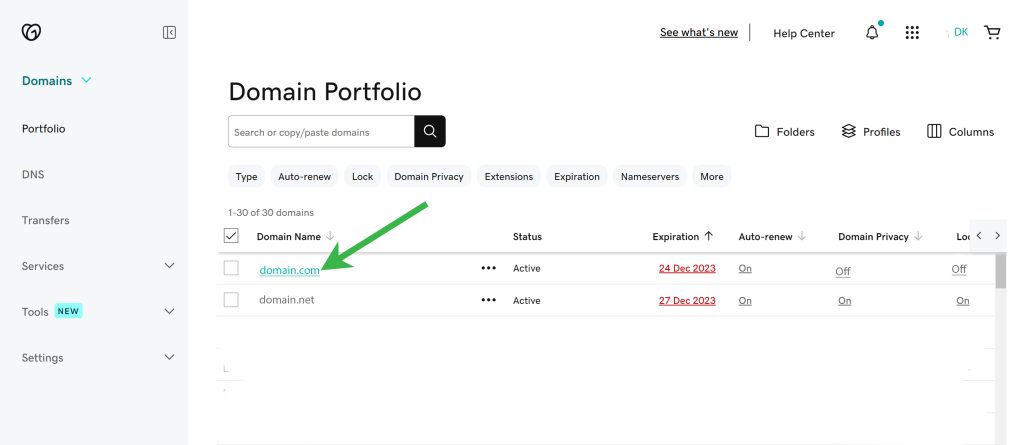
- Select the domain for which you require an Auth Code to access the domain settings page:
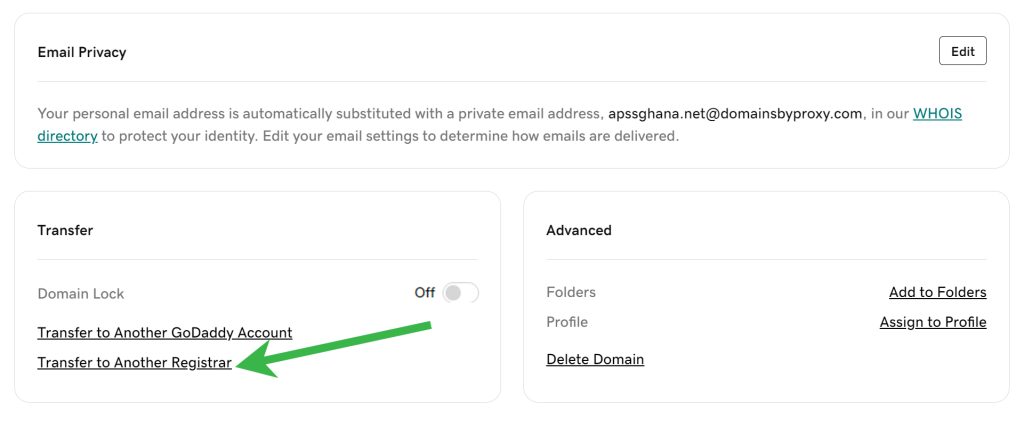
- Scroll down to the Transfer section and select Transfer to Another Registrar:
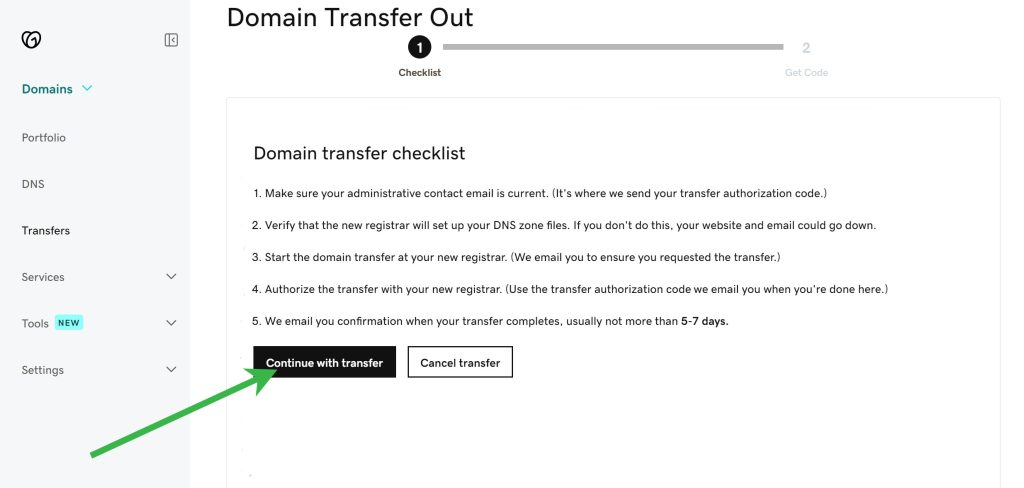
- Click on the “Continue with transfer” button to proceed:
- Select “Click here to see Authorization Code” to reveal the Auth Code:
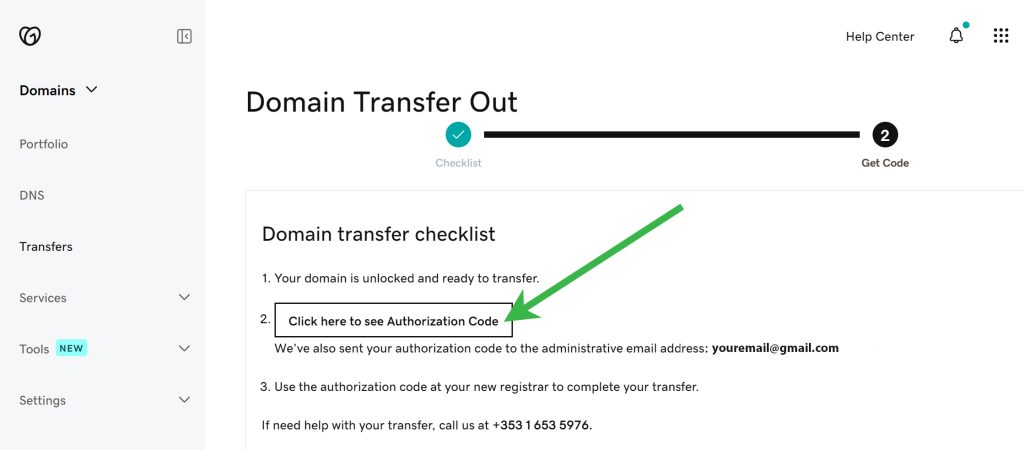
You can directly copy the code from this section. Furthermore, the code will also be sent to your administrative email address in case you need it later.
Now that you have the Authorization Code, you can use it with any registrar of your choice to transfer your domain name from GoDaddy. To transfer your domain name from GoDaddy to Aveshost, kindly refer to this comprehensive article on how to do so.
4. Authorize GoDaddy Domain Transfer
After submitting the transfer request and initiating the process at the registry level (typically within 20 minutes), the transfer commences. For most TLDs, the process may take up to 5-7 days.
To expedite the process, you have the option to approve the transfer on GoDaddy’s side.
Here’s how:
- While logged into your GoDaddy account, navigate to My Account and choose Domains from the dropdown menu.
- Access the Transfer section on your left:
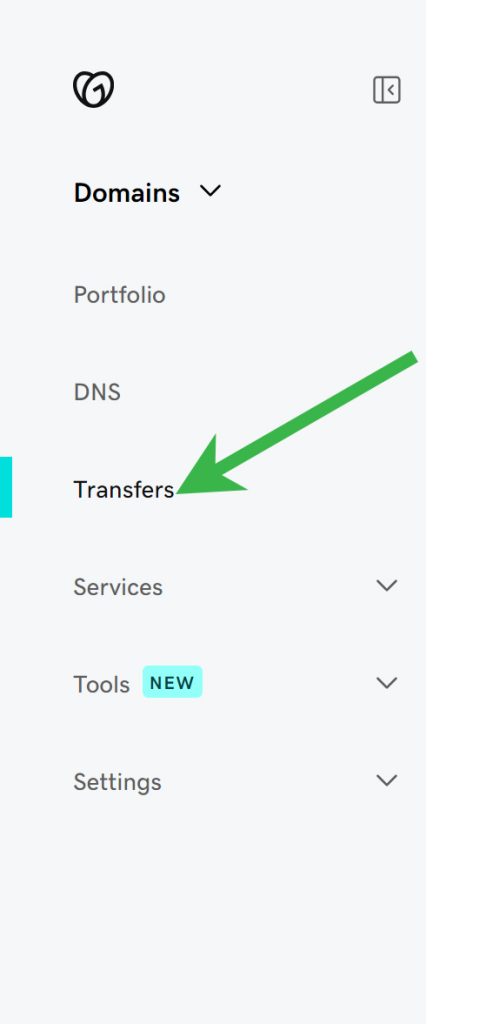
- Click on Transfers Out and choose the domain name you intend to transfer away from GoDaddy:
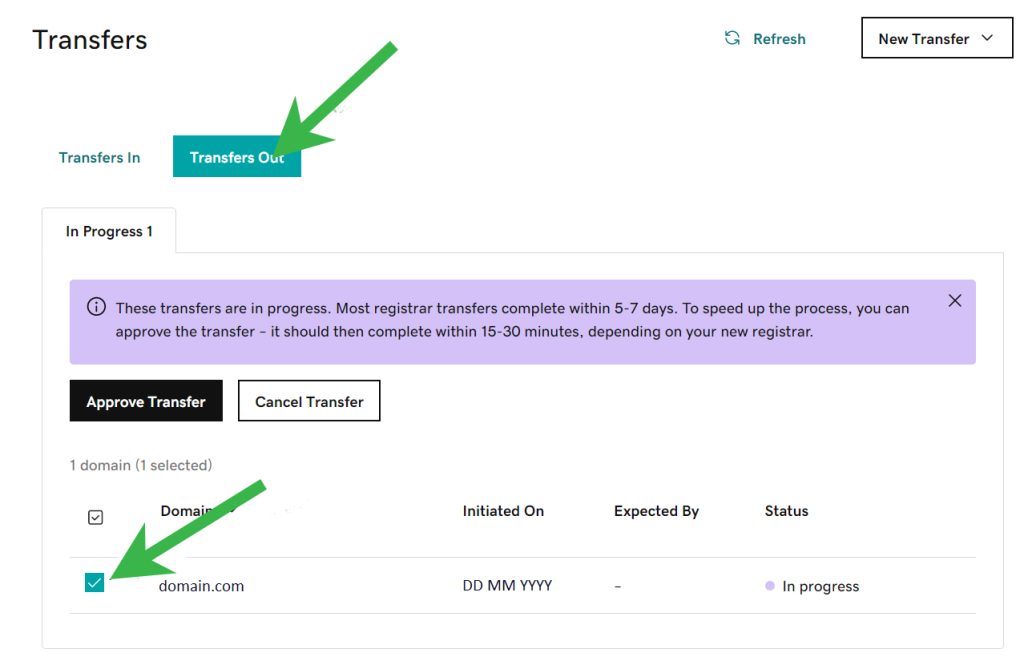
- Choose ‘Approve Transfer‘ and click OK. The request will be completed within 15 minutes.
And there you have it! We trust that this comprehensive guide has been helpful.
Also Read:
- How to Transfer Your Domain from Namecheap to Aveshost
- How to Transfer Your Domain from GoDaddy to Aveshost
- How to Buy Domain And Web Hosting With Mobile Money
- .com.gh Domain Registration: The Key to a Strong Online Presence in Ghana
- How to buy domain in Ghana
- How to Choose a Blog Name: 107+ Niche Ideas


This Post Has 5 Comments
Pingback: How to Transfer Your Domain from Namecheap to Aveshost | Aveshost Blog
Pingback: 5 Web Hosting Myths You Need to Stop Believing in 2024 | Aveshost Blog
Pingback: How to buy domain in Ghana | Aveshost Blog
Pingback: .com.gh Domain Registration: The Key to a Strong Online Presence in Ghana
Pingback: How to Boost Your Website Speed for SEO and Conversions